Hailstorms can last only a few minutes. The financial consequences, however, can linger for months. That’s why understanding how to document hail damage for an insurance claim is one of the most important steps a property owner can take after severe weather strikes. Proper documentation can help establish the extent of damage, create a clear record of conditions immediately following the storm, and provide valuable support throughout the claims process.
Many homeowners assume the insurance company will find every damaged component during its inspection. Sometimes that happens. Sometimes it doesn’t. The reality is simple: the better your documentation, the stronger your position. Whether you’re dealing with dented gutters, damaged siding, fractured shingles, or interior water intrusion, this guide explains exactly how to create a comprehensive record of hail damage and avoid the common mistakes that can weaken a claim.
Understanding Why Hail Damage Documentation Matters
Insurance claims are built on evidence. After a hailstorm, insurance carriers rely on documentation to determine what was damaged, how severe the damage is, and whether the loss can reasonably be connected to a covered weather event. Without strong documentation, important details can be overlooked. Even obvious damage can become harder to prove as time passes. Rain, sunlight, repairs, and additional weather events can alter conditions quickly.
Proper documentation helps establish:
- Date of loss
- Scope of damage
- Severity of impacts
- Property condition after the storm
- Need for repairs or replacement
Think of documentation as creating a permanent snapshot of the property immediately after the storm occurred. The more complete that snapshot is, the more valuable it becomes later.
Insurance Claims Are Evidence-Based
Many homeowners underestimate how much documentation influences claim outcomes. Insurance carriers generally do not make decisions based solely on verbal descriptions. They rely on photographs, inspection findings, weather data, reports, and physical evidence. Imagine two homeowners experience the same hailstorm. One homeowner takes dozens of photographs, saves weather reports, records videos, and keeps inspection reports. The other takes only a few pictures from the driveway. Which claim is likely to present a clearer picture of the damage? The answer is obvious. Documentation helps tell the story of what happened.
Documentation Helps Establish Cause of Loss
One of the most important functions of documentation is connecting damage to a specific weather event. Roofing materials naturally age. Paint fades. Metal oxidizes. Sealants deteriorate. When damage appears after a storm, documentation helps distinguish recent storm impacts from long-term wear and tear. The sooner evidence is collected, the easier it becomes to establish that connection.
Proper Documentation Can Reduce Disputes
Disagreements sometimes occur regarding:
- Scope of damage
- Repair methods
- Replacement needs
- Storm-related impacts
Detailed records can help clarify conditions and minimize uncertainty. Good documentation doesn’t guarantee agreement. It does, however, provide a stronger factual foundation.
Safety Comes First Before You Start
The excitement of finding storm damage often causes homeowners to rush outside. Don’t. Safety should always come before documentation.
After a hailstorm, conditions may include:
- Wet surfaces
- Loose shingles
- Fallen power lines
- Broken tree limbs
- Damaged structures
Start your inspection from the ground. Walk around the property carefully and look for obvious signs of damage. Avoid climbing onto roofs unless you have proper safety equipment and experience. Even professional inspectors use caution after severe weather events. If a roof inspection is necessary, consider hiring a qualified professional. A photograph is never worth an injury.
Use Safe Documentation Methods
Fortunately, documenting damage doesn’t require dangerous inspections.
Safe options include:
- Ground-level photography
- Binocular inspections
- Zoom lenses
- Drone photography
- Professional inspections
Many modern smartphones provide excellent image quality even from a distance. Use that technology to your advantage.
Step 1: Record Storm Information Immediately
One of the first things you should document isn’t the damage itself. It’s the storm. Create a storm log that includes:
| Information | Example |
| Date | April 15, 2026 |
| Time | 4:45 PM |
| Duration | 20 minutes |
| Hail Size | Quarter-sized |
| Wind Conditions | Moderate to severe |
| Additional Weather | Heavy rain |
This information helps establish the timeline of events. Save weather alerts, radar screenshots, and local weather reports whenever possible. Weather records often become valuable supporting evidence during claim evaluations.
Gather Supporting Weather Information
Useful sources include:
- National Weather Service reports
- Local television weather coverage
- Storm tracking websites
- Community hail reports
- Radar imagery
Take screenshots and save them in your claim folder. Digital records can disappear over time.
Create a Storm Documentation Log
A simple notebook or spreadsheet works perfectly.
Record:
- Storm date
- Weather observations
- Damage discovered
- Photos taken
- Calls made
- Inspections scheduled
The goal is to create a complete timeline.
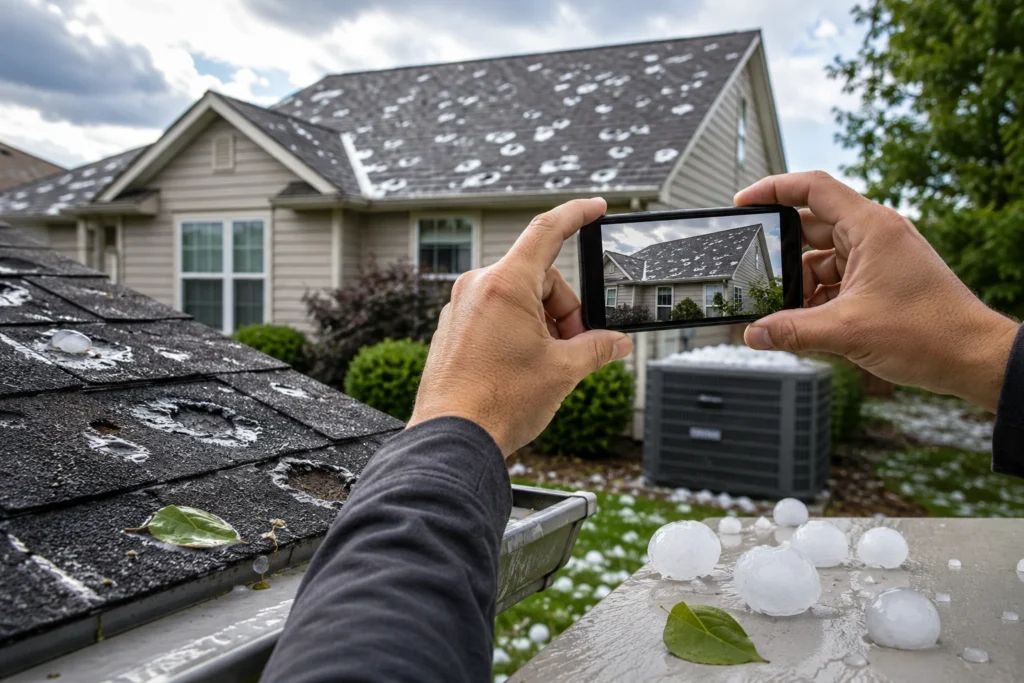
Step 2: Photograph the Hail Before It Melts
This step is frequently overlooked. Homeowners often begin documenting property damage but forget to photograph the actual hailstones. Hail size matters. Insurance adjusters, contractors, and engineers often consider hail size when evaluating potential impacts.
Place hailstones next to:
- Coins
- Measuring tape
- Rulers
- Common household objects for scale
Take photographs from multiple angles.
Capture:
- Hail on lawns
- Hail on driveways
- Hail accumulation on patios
- Hail in gutters
These images help establish storm severity. And remember hail melts fast. Don’t wait.
Take Multiple Reference Photos
Avoid relying on a single photograph.
Instead:
- Photograph several hailstones
- Capture different areas of the property
- Use multiple reference objects
- Include close-up and wide-angle views
Redundancy is valuable. If one image turns out blurry, you’ll have others available.
Step 3: Thoroughly Document Roof Damage
Roofs typically receive the most attention after hailstorms. For good reason. They absorb the majority of impacts. When documenting roof damage, capture both wide-angle and close-up photographs. Wide shots show overall roof condition. Close-up images reveal specific damage.
Look for:
- Bruised shingles
- Missing granules
- Fractured shingles
- Exposed fiberglass matting
- Cracked ridge caps
Many homeowners focus exclusively on shingles. That’s a mistake. Additional roofing components often sustain damage as well.
Inspect:
- Roof vents
- Flashing
- Pipe boots
- Valley metal
- Ridge caps
- Roof turbines
These items frequently appear in repair estimates and should be documented carefully. A strong Roof Hail Damage Insurance Claim often depends on identifying every damaged roofing component rather than only the most visible ones.
Best Practices for Roof Photography
If safe access is available:
- Photograph each roof slope separately
- Take overview photos first
- Follow with detailed close-ups
- Capture multiple damaged areas
- Include surrounding roofing materials
Context matters. A close-up dent is helpful. A close-up dent combined with wider context is even better.
Areas Frequently Missed During Documentation
Some roof components receive less attention during inspections.
These include:
- Flashing around chimneys
- Skylight frames
- Vent caps
- Ridge vents
- Pipe collars
- Metal roof accessories
Documenting these areas can provide additional evidence of storm impacts.
Step 4: Document Gutters and Downspouts
Metal surfaces are excellent indicators of hail activity. That’s why gutters often provide some of the clearest evidence.
Look for:
- Dents
- Impact marks
- Paint fractures
- Distorted metal
Photograph damage from multiple distances. Start with wide shots showing location. Then move closer for detail images. Consistency matters. If dents appear throughout multiple elevations of the home, document all affected areas. Patterns often tell a stronger story than isolated photographs.
Why Gutters Matter
Gutters are frequently easier to inspect than roofing surfaces. They also provide highly visible evidence. When hail strikes metal, impacts often remain visible long after the storm passes. This can make gutters valuable supporting documentation.
Inspect:
- Horizontal gutter runs
- Downspouts
- Gutter screens
- Splash guards
- Drainage accessories
Don’t limit your inspection to the front of the property. Walk the entire perimeter.
Step 5: Inspect Siding Carefully
Siding damage can vary significantly depending on material type. Vinyl siding may crack. Metal siding may dent. Fiber cement products may chip or fracture. Examine every elevation of the structure.
Pay particular attention to:
- South-facing walls
- West-facing walls
- Areas without tree protection
Take photos that clearly show:
- Size of impacts
- Number of impacts
- Location of damage
The goal isn’t simply to prove damage exists. It’s to show how extensive it is.
Common Signs of Hail Damage on Siding
Watch for:
- Circular impact marks
- Cracks
- Chipped finishes
- Surface fractures
- Paint damage
- Denting
Document every affected elevation. If only one side of the property is damaged, document that. If all sides show impacts, document those too. Accurate documentation matters more than assumptions.
Step 6: Check Windows, Screens, and Exterior Fixtures

Hail rarely limits itself to roofs and siding. Exterior fixtures often provide valuable supporting evidence.
Inspect:
- Window screens
- Window frames
- Exterior lighting
- Mailboxes
- Fence sections
- Outdoor furniture
Common signs include:
- Tears
- Dents
- Cracks
- Chips
- Broken glass
Photograph everything. Even seemingly minor damage can help demonstrate the intensity of the storm.
Don’t Forget Detached Structures
Homeowners often focus entirely on the primary residence. Meanwhile, detached structures may also sustain damage.
Inspect:
- Sheds
- Detached garages
- Pergolas
- Gazebos
- Pool equipment enclosures
- Fencing
These structures can provide additional evidence regarding the severity and direction of hail impacts. The more complete your documentation, the stronger the overall record becomes.
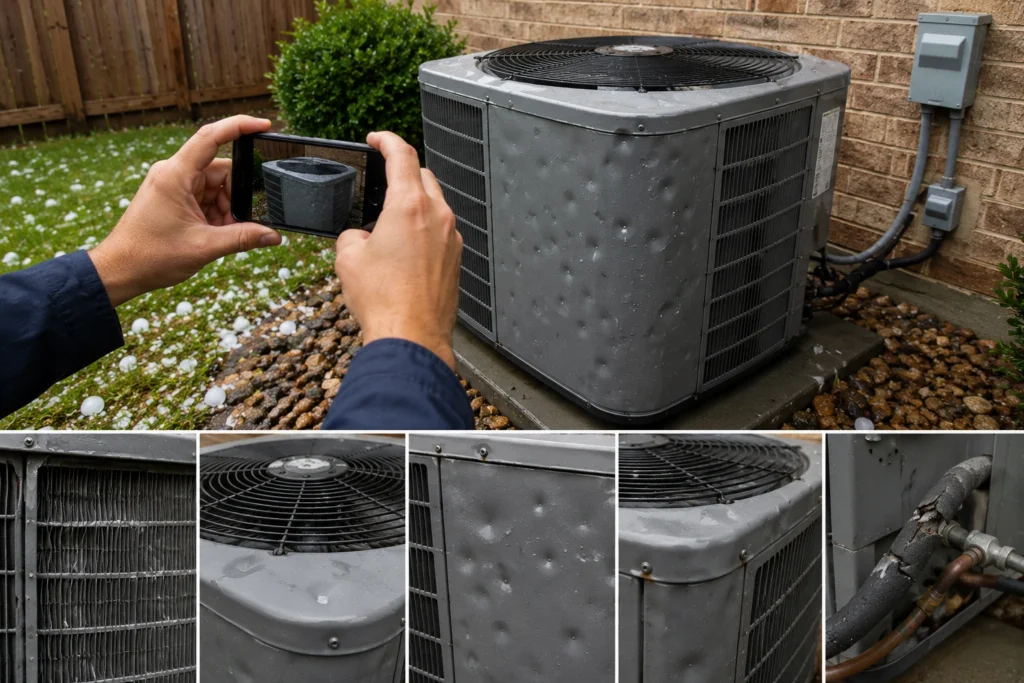
Step 7: Inspect HVAC Equipment
Air conditioning units frequently sustain hail damage. Unfortunately, many homeowners never inspect them. That oversight can be costly. A condenser unit may continue operating after a hailstorm while still suffering significant physical damage. Because the system still turns on, property owners often assume everything is fine. Not necessarily.
Look closely at:
- Condenser fins
- Coil protection grilles
- Metal housing panels
- Fan covers
- Refrigerant line insulation
Take photographs from several angles.
Document:
- Bent fins
- Impact marks
- Dents
- Physical deformation
- Cracked components
Use both close-up and wide-angle photographs. Wide shots establish location. Close-ups reveal specific damage.
Why HVAC Documentation Matters
HVAC systems are expensive. Even relatively minor hail impacts can affect efficiency, airflow, and long-term performance. If damage exists, documenting it early creates a valuable record before repairs or replacement occur. Don’t forget secondary equipment.
Inspect:
- Heat pumps
- Mini-split systems
- Exterior electrical disconnect boxes
- Generator housings
The goal is to document every storm-related impact on the property.
Step 8: Search for Interior Damage
Many people think hail damage stops at the exterior. Not always. Roof impacts can eventually lead to water intrusion. Water damage often appears inside the home before homeowners realize there is a roofing problem.
Inspect:
- Ceilings
- Walls
- Attics
- Flooring
- Trim
- Closets
- Storage areas
Look for:
- Water stains
- Peeling paint
- Sagging drywall
- Moisture marks
- Mold growth
- Warped materials
Take photographs immediately. Water damage tends to worsen over time, making early documentation especially important.
Inspect the Attic Carefully
The attic often reveals storm-related problems before they become visible elsewhere.
Use a flashlight and inspect:
- Roof decking
- Insulation
- Rafters
- Vent penetrations
- Chimney areas
Signs of concern include:
- Damp insulation
- Water streaks
- Active drips
- Dark staining
- Mold growth
Document everything thoroughly. Small leaks today can become major repairs tomorrow.
Monitor Interior Conditions Over Time
Not all leaks appear immediately. Continue inspecting the property for several weeks following the storm. Check the same areas periodically and photograph any changes. This ongoing documentation creates a timeline that may become valuable later.
Step 9: Create Video Documentation
Photographs are powerful. Videos add context. Conduct a complete property walkthrough while recording. Narrate what you’re seeing.
Explain:
- Location of damage
- Date of inspection
- Storm information
- Visible conditions
Video footage can capture relationships between damaged areas in ways still images cannot. A simple smartphone recording often provides tremendous value. Keep videos organized and store backups.
What to Include in Your Walkthrough
Begin outside.
Walk slowly around the property.
Show:
- Roof elevations
- Gutters
- Siding
- Windows
- Outdoor equipment
Then move indoors.
Document:
- Ceilings
- Attics
- Walls
- Flooring
- Areas showing moisture
Avoid moving too quickly. Slow, steady video is easier to review later.
Narration Improves Context
As you record, explain what you’re observing.
For example:
- “This is the north side of the house.”
- “Several dents are visible on this gutter.”
- “Water staining appeared after the storm.”
Simple narration creates useful context that photographs alone cannot provide.
Step 10: Maintain Detailed Written Notes
Photos alone don’t tell the whole story. Written notes fill the gaps.
Create a running log that includes:
- Inspection dates
- Observations
- Repairs completed
- Communication records
- Contractor visits
Detailed notes create a timeline. Timelines create credibility. And credibility often helps support claims when questions arise later.
What Should Be Included?
Record details such as:
| Event | Example |
| Storm Occurred | April 15, 2026 |
| Initial Inspection | April 16, 2026 |
| Contractor Visit | April 18, 2026 |
| Claim Filed | April 20, 2026 |
| Adjuster Inspection | April 28, 2026 |
A simple timeline helps keep events organized. Organization often becomes increasingly important as claims progress.
Record Conversations
Whenever you speak with:
- Contractors
- Insurance representatives
- Inspectors
- Engineers
Record:
- Date
- Time
- Name
- Key discussion points
You don’t need lengthy notes. A few sentences are often enough. The goal is maintaining an accurate record.
Save Every Inspection Report
If contractors inspect the property, save their reports. If engineers evaluate damage, save those reports too.
Documentation should include:
- Roofing inspections
- Contractor estimates
- Engineering evaluations
- Moisture assessments
- Drone reports
Keep both digital and printed copies whenever possible. Organization becomes increasingly important as a claim progresses.
Why Third-Party Documentation Matters
Independent observations often add valuable perspective. A roofing contractor may identify issues a homeowner missed. An engineer may document structural concerns. A moisture specialist may uncover hidden water intrusion. Each report contributes another piece of the overall picture. The stronger the documentation package, the easier it becomes to understand the full scope of damage.
Preserve Physical Evidence
Many homeowners unknowingly discard important evidence. Avoid throwing away damaged materials immediately.
Examples include:
- Broken shingles
- Damaged screens
- Bent flashing
- Dented metal components
- Cracked vents
Store items safely. Physical evidence can become useful if claim questions arise later. You don’t always need it. But if you do, you’ll be glad you kept it.
Best Practices for Storage
Place damaged materials in:
- Clearly labeled containers
- Storage bins
- Designated garage areas
Photograph the items before storing them.
This creates another layer of documentation.
Document Emergency Repairs
Storm damage sometimes requires immediate action.
Temporary repairs may include:
- Roof tarping
- Window boarding
- Leak mitigation
- Water extraction
Before repairs begin:
- Photograph damage.
- Photograph affected areas.
- Photograph temporary repairs.
Afterward, save:
- Receipts
- Invoices
- Contracts
- Material costs
These records help demonstrate why emergency actions were necessary.
Capture Before-and-After Conditions
One of the most effective documentation methods is creating comparison photographs.
Take pictures:
- Before temporary repairs
- During repairs
- After repairs
This sequence clearly shows:
- Initial damage
- Mitigation efforts
- Property stabilization
The visual timeline can become extremely valuable later.
Common Documentation Mistakes That Hurt Claims
Even diligent homeowners occasionally make mistakes. The most common include:
Waiting Too Long
Damage changes over time. Document conditions immediately. Every day that passes creates opportunities for evidence to deteriorate.
Taking Too Few Photos
More photographs are almost always better than fewer. Take wide shots. Take close-ups. Take duplicates. Storage space is cheap. Missing evidence can be expensive.
Missing Interior Damage
Exterior impacts frequently create hidden interior issues. Many homeowners focus only on roofing and gutters while overlooking moisture-related problems inside the home.
Poor Organization
Thousands of photos become difficult to use if they aren’t organized. Create folders. Use descriptive file names. Maintain backups.
Failing to Save Reports
Inspection reports often provide valuable third-party support. Never assume you can obtain another copy later. Save everything.
Overwriting or Deleting Evidence
One surprisingly common mistake involves accidentally deleting photographs while freeing up phone storage. Transfer images to secure locations immediately. Cloud storage is often an excellent solution.
Assuming Small Damage Doesn’t Matter
Minor impacts can reveal larger patterns. Document everything. Let the evidence tell the story. Not every dent or impact mark will be significant on its own. Collectively, however, they may help establish storm severity and the overall scope of damage. Good documentation isn’t about proving one damaged item. It’s about creating a complete and accurate record of what happened. That record becomes the foundation for every step that follows.
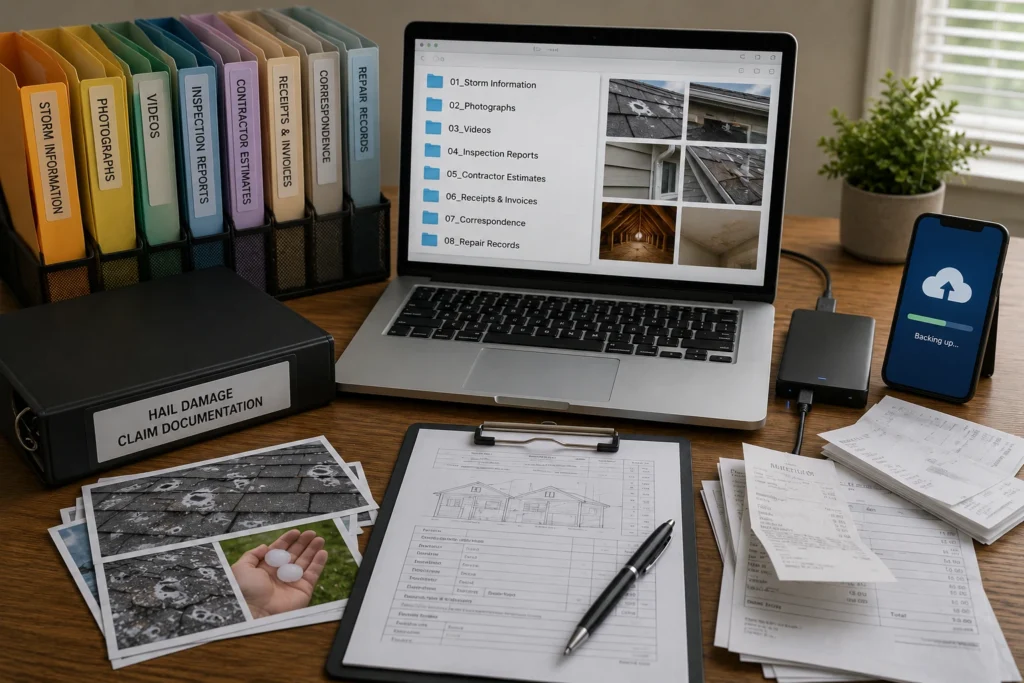
Creating a Complete Claim Documentation Package
Organization transforms raw evidence into usable evidence. Many homeowners collect hundreds of photographs, dozens of videos, multiple inspection reports, and stacks of receipts. Unfortunately, those records lose much of their value if they cannot be easily located when needed. The solution is creating a structured claim documentation package. Begin by organizing materials into separate folders.
Recommended categories include:
- Storm information
- Photographs
- Videos
- Inspection reports
- Contractor estimates
- Receipts and invoices
- Correspondence
- Repair records
Digital organization matters.
Use descriptive file names such as:
- FrontRoofDamage_April2026
- NorthGutterDents_April2026
- AtticWaterStains_April2026
- ContractorInspectionReport_April2026
These names may seem unnecessary today. Six months later, you’ll be glad you used them.
Back Up Everything
Never rely on a single storage location.
Store copies in multiple places:
- Computer hard drive
- Cloud storage
- External hard drive
- Secure online folder
Technology fails. Files get deleted. Phones get lost. Redundant storage protects valuable evidence.
Create a Master Claim Folder
Many experienced property owners maintain a master folder containing:
- Claim number
- Insurance contact information
- Inspection reports
- Important dates
- Communication logs
- Final estimates
This central location becomes the command center for the entire claim process.
A Simple Hail Damage Documentation Checklist
Before submitting information to your insurance carrier, verify you have collected the following items.
Storm Evidence
- Storm date
- Weather reports
- Radar screenshots
- Hail size photographs
- Local storm alerts
Exterior Damage
- Roof photographs
- Gutter damage
- Downspout damage
- Siding impacts
- Window damage
- HVAC damage
- Detached structure damage
Interior Damage
- Ceiling stains
- Wall damage
- Attic photographs
- Flooring impacts
- Water intrusion evidence
Claim Records
- Written notes
- Videos
- Inspection reports
- Contractor estimates
- Emergency repair receipts
Communication Records
- Emails
- Letters
- Inspection summaries
- Phone conversation logs
Using a checklist helps ensure important information doesn’t get overlooked.
Understanding Hidden Hail Damage
One of the biggest challenges homeowners face is that not all hail damage is immediately visible. Some forms of damage remain hidden for weeks or even months. A roof may appear intact from the ground while underlying components have sustained significant impacts. Common examples of hidden damage include:
Compromised Shingle Integrity
A hail impact may fracture the reinforcement layer beneath the visible surface. From a distance, the shingle may look perfectly normal. Over time, however, those fractures can accelerate deterioration.
Damaged Waterproofing Components
Flashing, underlayment, and sealants may sustain impacts that are not obvious during a casual inspection. These damaged materials can eventually allow moisture infiltration.
HVAC Performance Issues
Air conditioning systems may continue operating after a hailstorm even though condenser fins have been damaged. Reduced efficiency often develops gradually.
Interior Moisture Intrusion
Small roof penetrations may not produce visible leaks immediately. Instead, water slowly enters the structure until staining appears weeks later. This is why comprehensive documentation should never focus solely on obvious damage. A complete inspection often reveals issues that homeowners initially overlook.
Using Drones to Improve Hail Damage Documentation
Technology has changed the way homeowners and professionals document storm damage. A drone can provide a safer and more comprehensive view of a property’s condition after a hailstorm. Instead of climbing onto potentially damaged roofing surfaces, a drone allows high-resolution images and videos to be captured from above.
Drone imagery can help document:
- Overall roof condition
- Multiple roof slopes
- Ridge cap damage
- Vent and flashing impacts
- Areas that are difficult to access safely
Many drones now capture extremely detailed photographs that can be enlarged without losing clarity.
This can be particularly useful when documenting:
- Granule loss
- Bruising
- Surface fractures
- Impact patterns
If a drone is used, make sure all images are saved in their original resolution. Avoid compressing files or reducing image quality. High-quality images often provide more useful evidence during claim evaluations than low-resolution photos that become blurry when enlarged. Even if a professional inspection is later performed, drone documentation can establish a valuable visual record of the property’s condition immediately after the storm.
How Insurance Adjusters Typically Review Hail Damage
Understanding how inspections are conducted can help homeowners create stronger documentation. Insurance adjusters generally look for evidence that supports three primary questions:
- Did hail occur?
- Did the hail cause damage?
- Does the damage require repair or replacement?
Your documentation should help answer all three.
For example:
| Documentation Type | Purpose |
| Hailstone photos | Demonstrates storm severity |
| Weather reports | Confirms storm occurrence |
| Roof photos | Shows direct impacts |
| Interior photos | Documents resulting damage |
| Inspection reports | Provides professional observations |
| Repair estimates | Establishes scope and cost |
The more clearly your documentation answers these questions, the easier it becomes to present a complete picture of the loss. This doesn’t guarantee a particular outcome. However, it does ensure the available evidence accurately reflects the property’s condition.
Preparing for the Insurance Inspection
Many homeowners stop documenting once a claim is filed. That can be a mistake. Documentation should continue throughout the claim process.
Review Your Evidence
Organize:
- Photos
- Videos
- Inspection reports
- Receipts
- Weather records
Having everything readily available helps keep the inspection organized.
Create a Damage Summary
Prepare a simple document identifying:
- Roof damage
- Gutter damage
- Siding damage
- HVAC damage
- Interior damage
This serves as a roadmap during the inspection.
Be Present During the Inspection
Whenever possible, attend the inspection.
You don’t need to argue or advocate.
Simply ensure damaged areas are identified and accessible for review.
Good documentation combined with a thorough inspection often leads to a more complete understanding of the loss.
Why Ongoing Documentation Matters Throughout the Claim
Many people assume documentation ends once the insurance company inspects the property. In reality, the process may continue for weeks or months. Additional damage is sometimes discovered during repairs. Contractors may uncover hidden issues once roofing materials are removed. Water intrusion may become more visible after initial inspections.
Because of this, homeowners should continue documenting:
- New damage discoveries
- Repair progress
- Additional inspections
- Supplemental findings
Take photographs before repairs begin, during repairs, and after repairs are completed. Maintain updated records of all communications. If additional work becomes necessary, these records can help establish why the new findings were not visible initially. Strong documentation is not a single event. It is an ongoing process that creates a complete history of the claim from the day the storm occurs until repairs are finished.
Why Documentation Matters for Property Owners in Friendswood
Severe weather can affect homes differently depending on storm direction, property exposure, roofing materials, and surrounding structures. Property owners in Friendswood often face the challenge of identifying hail damage before it develops into larger problems. A few dents in a gutter may seem minor. A small fracture in a roofing shingle may appear insignificant.
However, both can serve as evidence of broader storm impacts. Because hail damage is often easier to document immediately after a storm, homeowners in Friendswood benefit from acting quickly once conditions are safe. Photographs taken the same day as the storm frequently provide stronger evidence than photos captured weeks later. For homeowners in Friendswood, thorough documentation can help establish a clearer record of loss and create a stronger foundation for evaluating the full scope of storm-related damage. The Science Behind Hail Damage Assessment In some cases, experts use advanced analytical methods to evaluate whether damage was caused by hail or by other factors.
One example involves the study of material failure patterns, a field known as Fractography. While homeowners are not expected to perform technical evaluations, understanding that experts may analyze damage at a detailed level reinforces the importance of collecting strong evidence from the very beginning. Clear photographs, videos, reports, and physical evidence often help create a more complete picture of what occurred during the storm.
Conclusion
Learning how to document hail damage for an insurance claim can significantly improve your ability to preserve evidence after a storm. The process itself is not complicated. It simply requires consistency, organization, and prompt action. Photograph everything. Record videos. Save reports. Keep receipts. Maintain written notes. Back up your files. Then continue documenting throughout the life of the claim. The stronger the evidence, the stronger the record. And the stronger the record, the easier it becomes to accurately demonstrate the full scope of damage.
When homeowners understand how to document hail damage for an insurance claim, they put themselves in a better position to preserve critical information before it disappears. Storm damage can change quickly. Evidence can fade. Memories can become less reliable. Documentation solves those problems. Whether you’re documenting a few visible impacts or widespread property damage, following the steps outlined in this guide will help create a detailed, organized, and credible record of the loss.
Ultimately, knowing how to document hail damage for an insurance claim is not just about taking pictures. It’s about protecting your ability to accurately document what happened, when it happened, and how it affected your property long after the storm has passed.
FAQs
Start by documenting the storm date, photographing hailstones if possible, and taking pictures of all visible property damage before making repairs.
Take as many clear photos as necessary to show the location, severity, and extent of the damage from multiple angles.
Yes. Photos of hailstones with a ruler or coin for size reference can help establish storm severity.
Absolutely. Modern smartphones can capture high-quality photos and videos that provide valuable claim documentation.
Inspect the roof, gutters, siding, windows, screens, HVAC equipment, fences, and any detached structures on the property.
Yes. Videos provide context and can show the overall condition of the property in ways that photos alone cannot.
If possible, retain damaged materials such as shingles or screens until the claim process is complete.
Keep photos, videos, receipts, inspection reports, contractor estimates, and written communication related to the claim.
Yes. Hail damage can lead to roof leaks that result in water stains, damaged drywall, and other interior issues.
Organized records make it easier to present evidence, track repairs, and provide information throughout the insurance claim process.